Evaluating Ultrasonic Dental Instrument Cleaners for Clinics and Labs
As noted in a recent article in Infection Control Today, “Ultrasonic cleaning has proven to be highly beneficial in today’s medical system. Small and complex medical equipment, such as endoscopes and dental instruments, cannot be cleaned efficiently using traditional methods. Ultrasonic cleaning, due to its use of small but powerful jets, can reach small crevices that are usually inaccessible by other methods.”
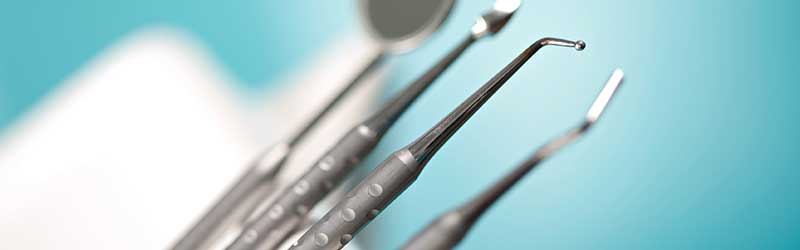
Ultrasonic dental cleaners are used to thoroughly remove contaminants before instruments are sterilized or disinfected*. Their use can minimize or eliminate the risk of injury that can occur when manually cleaning sharp instruments such as scalers and explorers.
This post explains how ultrasonic dental instrument cleaners help meet CDC and American Dental Association guidelines to clean reusable dental instruments and equipment.
The Science Behind Ultrasonic Cleaning Dental Instruments: Cavitation
The heart of an ultrasonic dental instrument cleaner is a process called cavitation. The equipment consists of a tank, a cleaning solution, a generator, and transducers.
The generator converts electrical energy into high-frequency sound waves, typically 20,000 cycles per second (20 kHz) and above, which the transducers then convert into mechanical vibrations. These vibrations travel through the cleaning solution, creating millions of microscopic vacuum bubbles.
When the bubbles contact dental instruments immersed in the cleaning solution they implode with tremendous force. These implosions, though microscopic, act like tiny scrubbers, blasting loose and carrying away debris, blood, tissue, and other contaminants from the surfaces of the instruments.
This method is incredibly effective because the bubbles are small enough to reach into the most intricate crevices, hinges, and grooves of dental tools—areas where manual scrubbing would be ineffective or even impossible.
For more details on this process see How Ultrasonic Cleaners Work.
Ultrasonic Dental Instrument Cleaners: What to Look For
Whether you are responsible for a dental clinic or dental lab, consider:
- Capacity: How many dental instruments you are cleaning in a single cycle (without crowding)
- Functionality: How much control and versatility you expect from the cleaning process
As to capacity, instruments are cleaned in baskets placed inside the ultrasonic tank. Basket dimensions are always smaller than tank dimensions, so review the vendor’s specifications for both to ensure proper fit and efficiency.
As to functionality, different models offer varying levels of programmability and performance. For example, the Elmasonic E Plus Series combines useful core features with capacities ranging from 0.25 to 7.5 gallons.
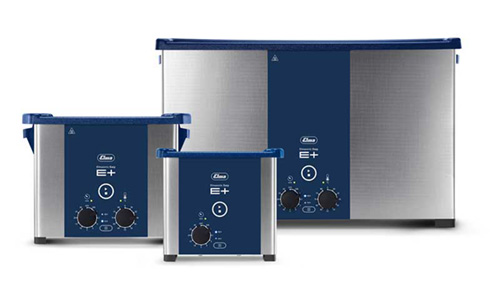
Key features of the Elmasonic E Plus Series include:
- Powerful 37 kHz ultrasonic cavitation cleans quickly and thoroughly
- Eco sweep mode for uniform and gentle cleaning action
- Dynamic mode for degassing and to remove tough contaminants
- Set cleaning time and temperature with the intuitive control panel
- LED indicates when set temperature is reached
- 1 to 30 minute or continuous operation lets you “set and forget”
- 6-hour auto shutoff to avoid potential damage
- 2-year warranty
Other Applications for Dental Ultrasonic Cleaners
Ultrasonic dental cleaners are also used for
- cleaning molds
- removing plaster and cement used in fashioning bridgework
- cleaning implant hybrid prosthesis and similar restorative procedures
Other Options for Cleaning Dental Instruments
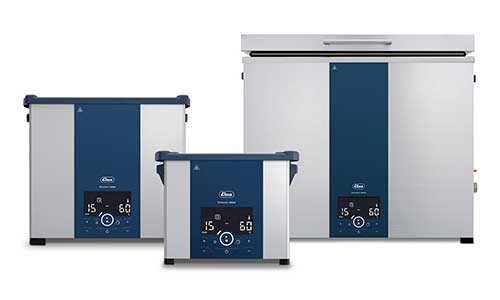
If your practice has additional requirements for your dental clinic or lab, Elma Ultrasonic offers additional options. These include the Elmasonic Select and Elmasonic P series, offering expanded operating parameters and a range of cleaning solution capacities.
How to Operate an Ultrasonic Dental Instrument Cleaner
Preparation Steps
- Until instruments are ready to be cleaned keep them immersed in either a germicidal or enzymatic presoak such as PreZyme. Do not let instruments dry out before ultrasonic cleaning.
- Use an ultrasonic cleaning solution formulated for cleaning dental instruments. While one might think a disinfectant solution is ideal for such applications in fact a disinfectant can make contaminants such as proteins harder to remove.
- Instead employ a detergent or enzyme solution for these applications. An example is MedClean C7 medical and surgical instrument cleaner diluted to 1 to 3 ounces per gallon of DI water.
- Fill the tank half full of water, add the correct amount of MedClean C7 for a full tank, add water to the fill line and activate the ultrasonic power (in Degas mode if available) to remove cavitation-inhibiting trapped air.
Cleaning Cycle
- Place the dental instruments, without crowding, in a mesh basket and suspend it by its handles into the ultrasonic cleaning solution so that the instruments are fully immersed.
- Cleaning time (typically 7 to 10 minutes depending on the size of the load) and the temperature are set using the intuitive control panel and the unit turned on. Note that solution temperatures should be kept below 42°C (107⁰F). Otherwise, particles could “bake” on the instruments and cannot be removed by sterilization.
Post-Cleaning Steps
- When the ultrasonic cleaning cycle is completed, rinse the instruments in water to remove solution residue and then move to the disinfecting or sterilizing steps to complete the process. As an interim step Barrier Milk can be used to lubricate hinges and prevent corrosion.
Important Cleaning Note
The ultrasonic cleaning solution should be changed at least once a day and the tank thoroughly cleaned and allowed to dry before being refilled with fresh solution.
The Indispensable Tool for Cleaning Dental Instruments
An ultrasonic dental instrument cleaner is an indispensable tool in modern dental practices.
By leveraging the power of high-frequency sound waves, it provides a safe, efficient, and highly effective method for cleaning dental instruments. This critical step not only protects the health of dental professionals by reducing the risk of sharps injuries but also plays a vital role in ensuring patient safety by preparing instruments for complete sterilization.
Understanding the science behind cavitation and adhering to a strict cleaning protocol are fundamental for any dental office committed to providing the highest standard of care and infection control.
Need more Information on an Ultrasonic Dental Cleaner?
Contact Tovatech, the authorized U.S. reseller of Elma Ultrasonic Cleaners, for answers to your questions on ultrasonic cleaning equipment and cleaning solutions.
*CDC Guidelines for infection protection practices in dental settings state “Cleaning to remove debris and organic contamination from instruments should always occur before disinfection or sterilization. If blood, saliva, and other contamination are not removed, these materials can shield microorganisms and potentially compromise the disinfection or sterilization process.”

